
One of the more stark reminders of the consequences of over-torquing something more than you should be is a huge oil leak and a cracked oil filter housing. So then, how do you repair a cracked oil filter housing?
Thankfully, though, a cracked oil filter housing isn’t impossible to resolve. If all you need is a quick fix that can get you going, for the time being, some epoxy, sealant, or thread locker could help seal those leaks.
However, that will only get you so far, before it begins leaking again. For more long-term and permanent solutions, a complete replacement is advised, in addition to re-threading the bolt if that’s damaged, too.
- Option 1: Quick fixes as a temporary solution
- Option 2: Long-term repairs or a complete replacement
- Preventive Maintenance
How To Fix Oil Filter Housing Leak
A cracked oil filter housing can lead to significant oil leaks, posing a serious problem for your car. It’s not an uncommon problem, and it could otherwise be caused by various factors, such as over-tightening.
Aside from that, the oil filter housing could also crack or get damaged due to material fatigue, or impact damage. The oil filter housing is a critical component that holds the your car’s oil filter securely in place.
Thus, this ensures that only clean oil can circulate through your engine. When this cracks, oil can escape, leading to potential engine damage – due to a lack of oiling and lubrication – if not addressed promptly.
In some cases, you can perform a quick fix to manage the situation temporarily. These solutions are not long-term but can be useful in emergency scenarios or until a more permanent repair can be made.
Two very popular quick fixes for a cracked oil filter housing include…
1. Epoxy Or Applying Some Sealant
Applying a strong epoxy such as JB Weld or a specialized automotive sealant can help to temporarily seal small cracks. It’s a popular solution that’s widely credited to work pretty well, but only if done properly.
With that being said, it’s crucial that you clean the area thoroughly and apply the product according to its instructions for the best results. Remember – this is a temporary fix only, not a permanent solution.
So, to properly apply an epoxy or strong sealant, here’s what you need to do:
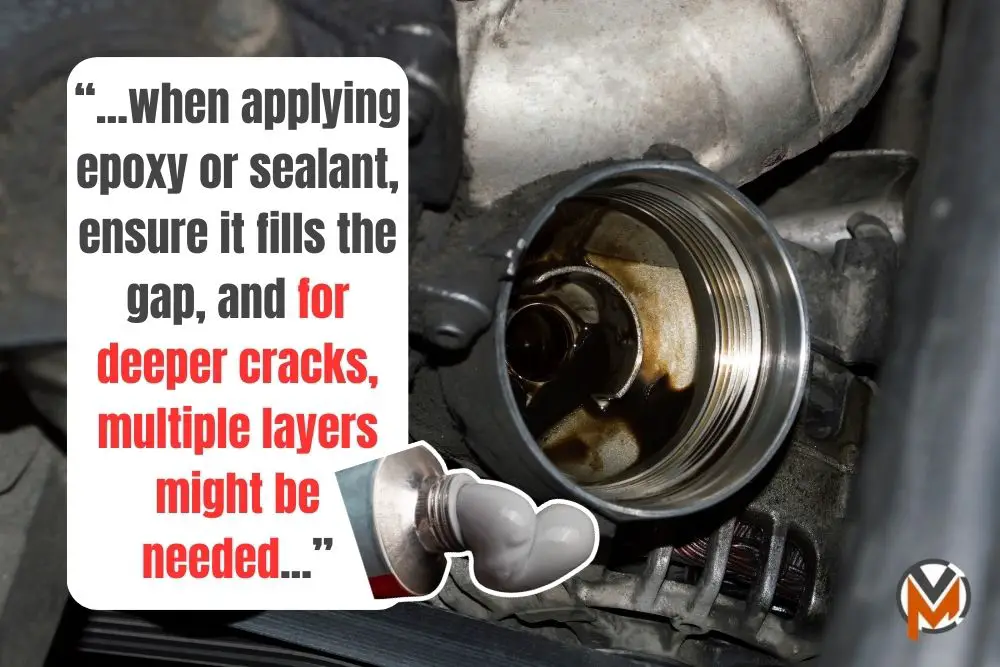
- Surface Preparation: First off, you’ll need to clean the cracked area on your oil filter housing thoroughly with a degreaser or alcohol to remove oil or dirt. This step is crucial for the adhesive to bond properly.
- Application: Now, you can begin applying the epoxy or sealant directly onto the crack, ensuring it fills the gap completely. For deeper cracks, multiple layers of epoxy or sealant might be necessary, allowing each layer to dry before applying the next.
- Curing Time: Once you’ve applied the epoxy or sealant, make sure you follow the product’s instructions for curing time. Rushing this process could lead to a weak bond and potential failure of the repair.
2. Using Some Thread Locker
For cracks or damage around the bolt threads, using a thread locker could sometimes stabilize or seal the damaged area. This is particularly useful if the crack is small and not subjected to high pressure.
Moreover, this method is particularly effective for small cracks where the structural integrity isn’t severely compromised. Again, just like epoxy or sealant, thread locker is only a temporary fix, not a proper repair.
So, here’s how you can use thread locker to fix cracks on the oil filter housing bolt threads:
- Cleaning the Threads: Remove any oil or debris from the threads. As I mentioned earlier, a clean working area will ensure a more seamless bond between the thread locker and those cracks.
- Applying Thread Locker: Now, you can begin applying a high-strength thread locker to the bolt threads of your car’s damaged oil filter housing.
- Reassembly: Once you’re done, carefully reinsert the bolt, ensuring that there’s an even distribution of the thread locker within the bolt threads.
- Curing: As with earlier, allow the thread locker to cure as per the manufacturer’s instructions before you can finalize this repair and get back on the road.
How To Replace Oil Filter Housing
Repairing a cracked oil filter housing is vital for maintaining your car’s health. While temporary fixes that I’ve explained earlier can help in a pinch, investing in a long-term solution is preferred, if possible.
The latter can better guarantee the longevity and performance of your car’s engine. Always consider the severity of those cracks, and consult with a mechanic if you’re unsure about the best course of action.
Speaking of, there are a few long-term fixes and solutions that you could consider:
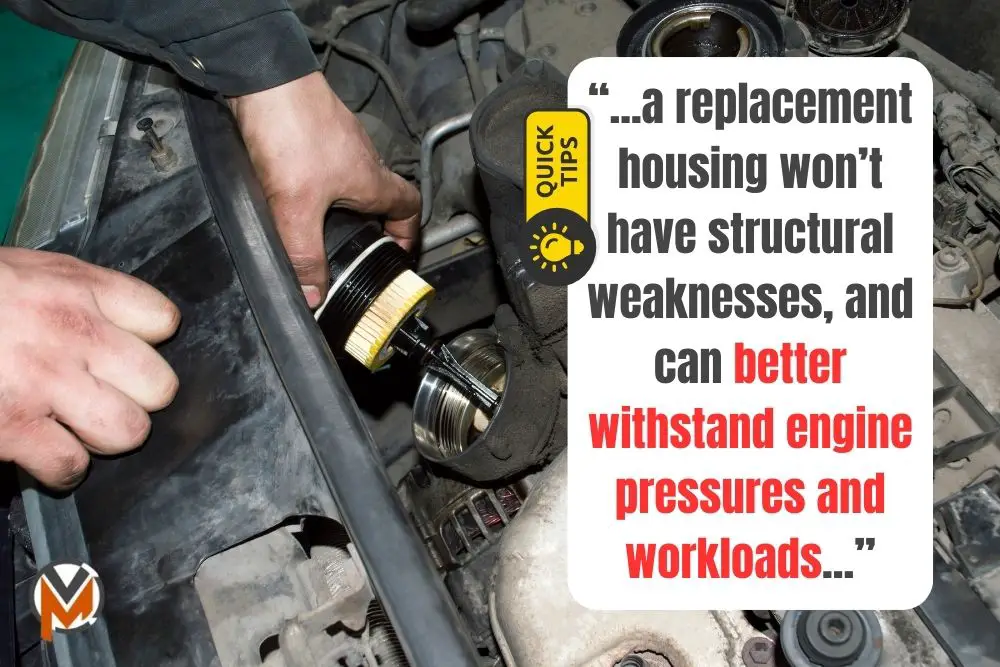
1. Replacing The Oil Filter Housing
The most reliable solution is to replace the entire oil filter housing. This ensures that the new part will not have any structural weaknesses, and could better withstand the pressures and demands of the engine.
This is the most definitive solution. When replacing the cracked oil filter housing, there are some things to consider:
- Choose Quality Parts: Make sure you opt for OEM (Original Equipment Manufacturer) parts or equivalents from reputable brands. Cheap oil filter housings should be avoided at all costs, as they’re commonly not as reliable or as long-lasting.
- Professional Installation: Consider having the replacement done by a professional to ensure it’s installed correctly, and to avoid potential issues down the line.
2. Professional Welding or Brazing
In some cases, a professional welder or machinist could repair the crack, especially if the housing is made of metal. You should not attempt this option as a DIY project because it requires extensive expertise.
Also, remember that this solution is only suitable for metal oil filter housings. When considering welding or brazing, here’s what a typical repair looks like:
- Finding a Skilled Welder: To work on welding or brazing, you’ll need to look out for a professional with experience in automotive welding. If you happen to have some welding experience, this is technically feasible as a DIY project. But, I wouldn’t recommend it, especially for those lacking the experience and know-how.
- Assessing the Feasibility: The aforementioned welder that you’ve hired will then assess if the crack on your oil filter housing can be effectively repaired by welding or brazing.
- Post-Repair Treatment: After welding the cracks on the oil filter housing, the damaged area may need to be treated for corrosion resistance.
3. Re-threading or Bolt Replacement
If that crack is localized around a bolt area, re-threading the hole or using a longer bolt to engage more threads, could also be an effective solution. If you’re looking for long-term repairs, this is suitable.
Although, do bear in mind that this approach does require precision. And, an understanding of the housing’s material and thread specifications. If the crack affects the bolt area, here’s how to do it:
- Assessing Thread Damage: First up, you’ll have to determine if the threads are damaged along with the housing. If so, then re-threading and replacing the bolt can be considered.
- Re-threading: If the threads on the oil filter housing are damaged, they may need to be re-threaded. You can do this with a tap and die set.
- Longer Bolt: If feasible, using a longer bolt that can engage undamaged threads beyond the crack could be an effective solution.
Oil Filter Housing Preventive Maintenance
Given how troublesome a cracked oil filter housing can be, it’s far easier to adapt yourself to make sure it doesn’t happen again. Here are some tips to ensure that your oil filter housing remains in good shape:
- Proper Torque Application: Use a torque wrench to apply the correct amount of torque as specified in the vehicle’s service manual. Over-tightening the oil filter housing can cause stress fractures, which is what eventually leads to cracking.
- Regular Inspections: Incorporate an inspection of your car’s oil filter housing more frequently into regular vehicle maintenance. When you’re checking the oil filter housing, look out for signs of stress, cracks, or oil residue that might indicate a leak.
- Quality Parts and Filters: Always opt for high-quality parts. Inferior quality can lead to premature failure and potential damage to the engine. When choosing filters, ensure they are compatible with your vehicle’s make and model.