
Here’s what you need to know about replacing your alternator…
- How to Diagnose a Failing Alternator
- What to Look for When Replacing an Alternator
- Benefits of a High-Performance Alternator
- Common Signs of a Bad Alternator
- How to Choose the Right Size and Type
- Tips for Installing a New Alternator Yourself
- The Cost Benefits of Replacing an Old Alternator
- What Tools Are Necessary for Replacing
- Different Types of Automotive Electrical Systems
- Troubleshooting Common Problems
How to Diagnose a Failing Alternator
The alternator is an essential component of a vehicle’s electrical system, as it is responsible for generating the power needed to keep the battery charged and all of the vehicle’s electrical components running. If your alternator is failing, you may experience a variety of symptoms that can range from dim headlights to a dead battery.
To diagnose a failing alternator, you should first check for any warning lights on your dashboard that indicate an issue with your charging system. You should also check the voltage output of your alternator using a multimeter or voltmeter. Finally, if necessary, you can have your alternator tested at an auto repair shop or dealership to determine if it needs to be replaced.
- To begin diagnosing a failing alternator, start by checking for any warning lights on your dashboard that indicate an issue with the charging system. Common indicators include “Battery,” “Check Charging System,” and “ALT” or “GEN.” If one of these lights is illuminated on your dashboard, it means there may be an issue with either the battery or the charging system itself and further investigation will be required to determine which component needs attention.
- Next, use a multimeter or voltmeter to measure the voltage output of your alternator while running at idle speed (around 800-900 RPM). The ideal reading should be between 13-14 volts; anything lower than this indicates that there may be an issue with either the regulator or brushes inside of the unit itself and further investigation will need to take place to pinpoint exactly what part needs replacing.
- Finally, if necessary you can have your alternator tested at an auto repair shop or dealership to determine whether it needs replacing entirely. During this test, they will measure both its current draw as well as its voltage output under load conditions to accurately assess its condition and performance level before making any recommendations regarding replacement parts or services needed for repair/replacement purposes.
By following these steps you should be able to diagnose whether there are any issues present within your vehicle’s charging system due specifically to problems (such as when your new alternator is not charging the battery) related to its alternator unit itself – allowing you to take appropriate action accordingly to ensure continued safe operation moving forward.
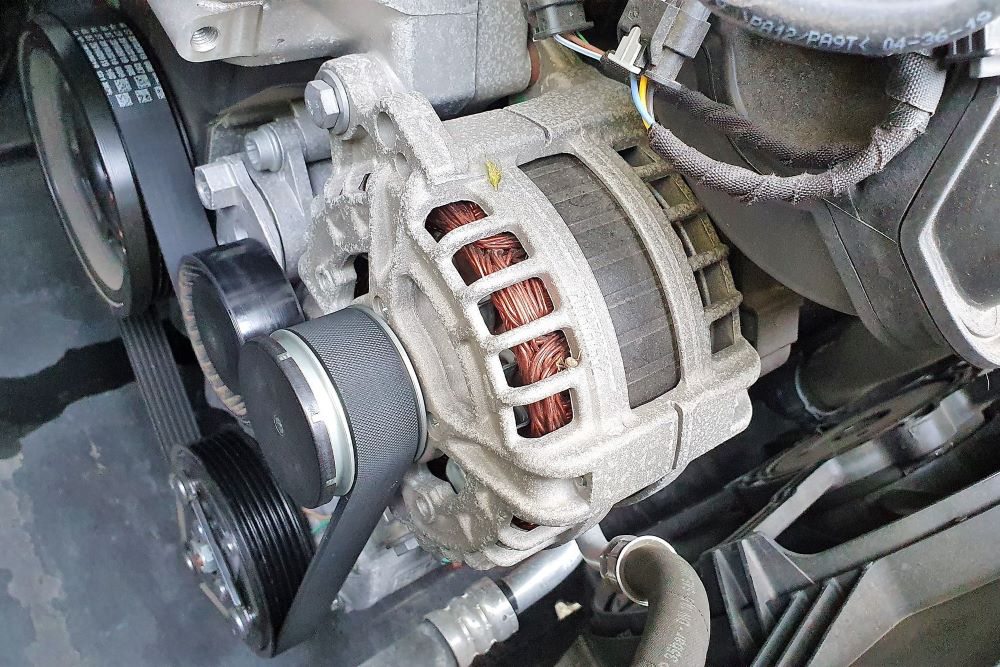
What to Look for When Replacing an Alternator
When replacing an alternator, it is important to ensure that the new part is compatible with the vehicle. The first step in doing this is to check the make and model of the car, as well as its year of manufacture. This will help determine which type of alternator should be used. Moreover, it can give you an idea of how long do car alternators last.
The next step is to check for any additional features that may be required for a particular vehicle. For example, some cars require an external voltage regulator or a special pulley system to work properly with a new alternator. It is also important to consider whether or not the new part will fit into existing brackets and wiring harnesses without modification.
Finally, it is essential to ensure that the new alternator meets all safety standards and has been tested for quality assurance purposes before installation. This can usually be done by checking with either the manufacturer or an independent testing laboratory.
The Benefits of Installing a High-Performance Alternator
Installing a high-performance alternator can provide numerous benefits for your vehicle. Alternators are responsible for providing power to the electrical components of your car, such as headlights, interior lights, and audio systems.
A high-performance alternator is designed to produce more power than a standard alternator, allowing it to better meet the demands of these components. Here are some of the advantages that come with installing a high-performance alternator:
- Increased Battery Life: High-performance alternators generate more electricity than standard models, which helps reduce strain on your battery and increases its lifespan. This means you won’t have to replace your battery as often and can save money in the long run.
- Improved Electrical Performance: With increased power output from a high-performance alternator comes improved performance from all electrical components in your vehicle. This includes brighter headlights, louder audio systems, and faster charging times for devices plugged into USB ports or cigarette lighters.
- Reduced Engine Load: High-performance alternators require less energy from the engine than standard models do because they generate more electricity on their own. This reduces strain on the engine and improves fuel efficiency by up to 10%.
- Enhanced Reliability: High-performance alternators are built with higher quality materials than standard models so they last longer and require less maintenance over time. They also feature advanced technology that allows them to better handle sudden surges in demand without failing or overheating like traditional units do.
Overall, installing a high-performance alternator can provide numerous benefits for your vehicle including increased battery life, improved electrical performance, reduced engine load, and enhanced reliability compared to traditional units.
If you’re looking for an upgrade that will improve both performance and efficiency in one go then investing in a high-quality aftermarket model is worth considering.
Common Signs of an Alternator in Need of Replacement
The alternator is an essential component of a vehicle’s electrical system, as it is responsible for generating the power needed to keep the battery charged and all of the car’s electrical components running. If your alternator is failing, you may experience a variety of symptoms that indicate it needs to be replaced.
- One common sign that your alternator may need replacing is dim or flickering headlights. This can be caused by a low voltage output from the alternator, which can cause lights to appear dimmer than usual or even flicker on and off.
- Another symptom of an alternator in need of replacement is difficulty starting your vehicle. If your battery has enough charge but still won’t start, this could be due to insufficient power being generated by the alternator.
- You may also notice strange noises coming from under the hood when you turn on your engine; this could indicate that there are problems with one or more components in the charging system, including the alternator itself.
- Finally, if you notice any warning lights illuminated on your dashboard related to charging issues (such as “battery” or “alternator”), this could mean that there are problems with either component and they should be checked out immediately by a qualified mechanic.
In conclusion, if you experience any combination of these symptoms while driving – dim headlights, difficulty starting up your car, strange noises coming from under the hood, or warning lights related to charging issues – then it’s likely time for an alternator replacement.
How to Choose the Right Size and Type of Alternator for Your Vehicle
When it comes to choosing the right size and type of alternator for your vehicle, there are several factors to consider. The most important factor is the size of your engine. Alternators come in different sizes and power ratings, so you need to make sure that you choose one that is compatible with your engine’s specifications.
Additionally, you should also consider the type of electrical system in your vehicle as well as any additional accessories or modifications that may require more power from an alternator.
- The first step in selecting an alternator is determining the size of your engine. Alternators are rated according to their output capacity, which is measured in amperes (amps). Generally speaking, larger engines require higher-rated alternators than smaller engines do. You can find out what size alternator you need by consulting either a service manual or a parts catalog for your specific make and model of vehicle.
- Once you have determined the correct size for your engine, it’s time to decide on a type of alternator. There are two main types: brushless and brushed models. Brushless models tend to be more efficient than brushed models but they also cost more money upfront; however, they usually last longer and require less maintenance over time so they may be worth the extra cost if longevity is important to you. Brushed models are cheaper upfront but will likely need replacing sooner due to wear-and-tear on their internal components over time; however, they may be suitable if budget constraints prevent purchasing a brushless model initially or if frequent replacement isn’t an issue for you due to short-term use or other reasons such as racing applications where performance takes precedence over longevity anyway.
- Finally, when selecting an alternator it’s important to take into account any additional electrical accessories or modifications that may draw extra power from it such as aftermarket audio systems or high-wattage lighting systems like HID headlights etc. since these will increase its load requirements beyond what was originally designed for by its manufacturer which could lead to premature failure if not taken into consideration when making a selection decision initially; therefore always ensure that whatever model chosen has enough output capacity (measured in amps) available above what’s needed just by its factory specifications alone before making a purchase decision so as not avoid any potential problems down the road later.
Tips for Installing a New Alternator Yourself
Installing a new alternator is an important task that requires some knowledge and skill. If you are considering installing a new alternator yourself, here are some tips to help you get the job done safely and correctly.
1. Read the instructions carefully: Before beginning any work on your vehicle, make sure to read through all of the instructions that come with your new alternator. This will ensure that you understand how to properly install it and avoid any potential problems or hazards.
2. Disconnect the battery: Before starting any work on your vehicle’s electrical system, it is important to disconnect the battery first to prevent electric shock or damage to other components in your car’s electrical system.
3. Remove old alternator: Once you have disconnected the battery, remove all of the mounting bolts from your old alternator and then carefully remove it from its location in your engine bay. Make sure not to damage any other components while doing this step as this could cause further issues down the line when attempting to install a new one.
4. Install new alternator: After removing your old alternator, begin by attaching all of its mounting bolts back into place before connecting its wiring harnesses back up again according to their respective diagrams found in either online resources or within instruction manuals provided with newer models of vehicles/alternators themselves (if applicable). Finally, connect up both positive and negative terminals before testing out if everything works correctly by turning on the ignition switch without starting the engine yet (this will allow for power flow through the newly installed part).
5. Test out installation: Once everything has been connected up properly, start up the engine and test out if the newly installed part works correctly by checking the voltage output at both terminals using a multimeter device (or equivalent). If the voltage output is within an acceptable range then the installation was successful; otherwise, repeat the steps above until the desired result is achieved.
The Cost Benefits of Replacing an Old Alternator with a New One
Replacing an old alternator with a new one can be a cost-effective solution for many vehicle owners. However, be wary of the cost to replace an alternator at a dealership. Alternators are responsible for providing power to the electrical components of a car, such as headlights, interior lights, and the radio.
When an alternator fails or begins to malfunction, it can cause serious problems with the vehicle’s electrical system. Replacing an old alternator with a new one is often more cost-effective than attempting to repair it.
- The primary benefit of replacing an old alternator with a new one is that it eliminates the need for costly repairs or replacements of other parts in the vehicle’s electrical system that may have been damaged by the failing alternator. In addition, replacing an old alternator will also help ensure that all components in the car’s electrical system are functioning properly and efficiently. This can help reduce fuel consumption and improve the overall performance of your vehicle.
- Another benefit of replacing an old alternator is that it will extend its lifespan significantly compared to repairing or rebuilding it. A rebuilt or repaired part may only last for several months before needing further repairs or replacement again; however, when you replace your existing part with a brand-new one you can expect years of reliable service from your car’s electrical system without any additional maintenance costs associated with repairing or rebuilding parts in between replacements. Particularly, among the best brand options of car alternator replacements.
- Finally, replacing an old alternator also helps protect against potential safety hazards caused by faulty wiring due to worn-out parts in your car’s electrical system which could lead to fires and other dangerous situations while driving on public roads and highways.
In conclusion, replacing an old alternator with a new one offers numerous benefits including eliminating expensive alternator repair cost and processes on other parts in your car’s electrical system; extending its lifespan significantly; improving overall performance; reducing fuel consumption; and protecting against potential safety hazards caused by faulty wiring due to worn out parts in your car’s electrical system which could lead to fires and other dangerous situations while driving on public roads and highways.
What Tools Are Necessary for Replacing an Automotive Alternator?
Replacing an automotive alternator requires a few basic tools. These include a socket set, ratchet, and extension bar; pliers; wire cutters; and a wrench set. Additionally, it is helpful to have an automotive stethoscope or multimeter for testing the alternator before installation. Finally, safety glasses should be worn when working on any vehicle component.
Understanding the Different Types of Automotive Electrical Systems and Their Components
Automotive electrical systems are complex and essential components of modern vehicles. They provide power to the various components that make up a car, such as the engine, lights, and other accessories. Understanding the different types of automotive electrical systems and their components is important for anyone who works on cars or owns one.
- The most common type of automotive electrical system is a 12-volt system. This type of system uses a 12-volt battery to power all the vehicle’s electrical components. The battery supplies direct current (DC) electricity to the starter motor, alternator, ignition switch, headlights, taillights, interior lights, and other accessories. The alternator recharges the battery while driving by converting mechanical energy from the engine into electricity.
- Another type of automotive electrical system is an alternating current (AC) system which uses an AC generator instead of an alternator to produce electricity for powering vehicle accessories such as air conditioning units or electric windows. AC systems are typically found in older vehicles but can also be found in some newer models as well.
- The third type of automotive electrical system is a hybrid electric vehicle (HEV). HEVs use both DC and AC power sources to operate their various components including motors for propulsion and charging batteries with regenerative braking technology that captures energy from braking motion and stores it in batteries for later use when accelerating again or powering other accessories like air conditioning units or electric windows.
- Finally, there are also high-voltage systems that use higher voltages than traditional 12-volt systems to reduce wiring size while still providing enough power for all necessary functions within a car’s electronics package. High voltage systems can range anywhere from 48 volts up to 600 volts depending on what kind of application they are being used for. These types of systems require specialized training due to their complexity so anyone working with them must have proper knowledge before attempting any repairs or maintenance tasks.
In conclusion, understanding different types of automotive electrical systems, their components, and how they work together is essential knowledge when it comes to owning or working on cars. Knowing this information will help ensure that any repairs made will be done correctly so your car runs safely and efficiently at all times.
Troubleshooting Common Problems with Automotive Electrical Systems After Replacing an Alternator
When replacing an alternator in an automotive electrical system, it is important to be aware of potential problems that may arise. This article will provide a guide to troubleshooting common issues that can occur after replacing an alternator.
- The first step in troubleshooting any issue with the automotive electrical system is to check the battery voltage. If the battery voltage is low, it could indicate a problem with the alternator or other components of the electrical system. It is also important to check for any loose connections or corroded terminals on both the battery and alternator.
- If there are no visible signs of damage or corrosion, then it may be necessary to test both the charging and starting systems using a multimeter or other diagnostic tool. If either system fails, then further investigation will be needed to determine what component needs repair or replacement.
- Another common issue after replacing an alternator is poor engine performance due to incorrect belt tensioning on either side of the pulley wheel assembly. This can cause excessive wear on both belts and pulleys as well as reduce engine power output due to slipping belts and misaligned pulleys. To ensure proper belt tensioning, use a torque wrench when tightening all bolts associated with this assembly before starting up your vehicle again after the installation of a new alternator unit.
- Finally, if all else fails and you are still experiencing issues with your automotive electrical system after replacing an alternator, it may be necessary to take your vehicle to a qualified mechanic for further diagnosis and repair work if needed.